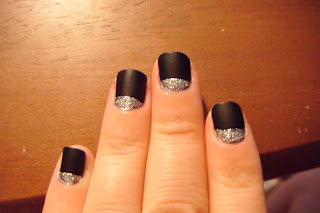
Hey everyone! Sorry it has been SO long since I posted last, things have been kinda crazy! On top of being busy, I broke a couple nails and had to grow them back a little before I could do a couple designs, but I am back in the game now :). First of all I want to thank you all for sending me inspiration photos, I am going to try and get to them all (I have had a lot of requests!!). This post is a simple one, I call it the upside down french mani, and of course I found it on pinterest!
Here is what my nails looked like when I was done. Here was where my inspiration came from:
Ok, so all you need for this one is a base color (mine is black), matte topcoat, some tape or mani tip stickers, and some glitter polish (I used silver!). Start with your base color:
Then I added the matte top coat:
Then let it dry COMPLETELY!! Once they are dry, you can start using the tape or stickers. You want to put the stickers at the base of the nail to make a half-circle shape. Then you can start adding the glitter and peeling the stickers away!
I found that adding a little clear polish over the glitter makes it more sparkly, but be careful not to get it on the matte polish! Here is the finished product!!


No comments:
Post a Comment